 dailynewsnblog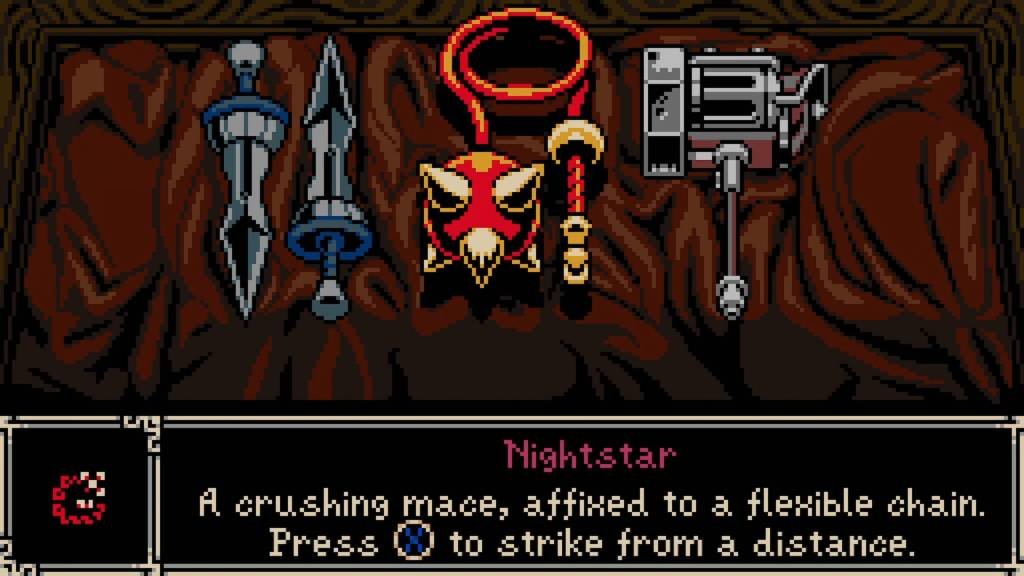
No matter what weapon type you prefer, Mina the Hollower has plenty of ways for her to bring the fight to the enemy. Whether it’s the starting lineup of a Castlevania-style whip, some swift daggers, or an all-or-nothing hammer blow, or the two you find later on, there’s a variety that genuinely feels different. Heck, it even makes New Game Plus playthroughs a little more appealing as you attempt to master wielding all five that are available.
You should also consider which Mina The Hollower Sidearms to use alongside them, as well as the best Mina The Hollower Trinkets to make your time in this surprisingly long and maze-like open-world game a whole bunch easier. From your starting weapon choices to unlockable gear that vastly changes how you play, here is everything you need to know about the Mina The Hollower arsenal.

Choosing your default weapon
At the beginning of the game, you’ll have a choice between the Nightstar, Whisper and Vesper, and the Blaststrike Maul. Nightstar is the medium damage option and acts most like a whip from Castlevania. It excels in range, but takes some getting used to. Whisper and Vesper are two short-range knives that Mina thrusts in quick succession with each button press, but they deal low initial damage and have a short range. The Blaststrike Maul is a hammer that’s slow but powerful, with swings that crush most smaller enemies with ease.
If you’re in a dilemma as to which one to choose, there’s some good news. You will get access to every weapon eventually, and you can try them out with no penalty in the area you start in to see which one you prefer.

Ossex: City Center Blacksmith
You can find Legovich’s smithy in the red building in Ossex City Center, where he sells the upgraded version of your chosen weapon, as well as copies of the other two weapons, along with Battery Buster and Guardian Casket. The Battery Buster is a short-range mace that adds ammo to its gun mode with every blow you strike. You can see which mode you’re in by looking at the orb’s colors (red for melee, blue for ranged), and also see how many shots are left by counting the orbs surrounding Mina. The Guardian Casket is a shield that Mina can thrust for a short-range attack, or time with an enemy’s attack to deflect it and dish out a huge amount of damage in return.
No matter which option you go for, the price starts at 2,000 Bones for your first upgrade, but settles on 2,500 for every other purchase. The second purchase stalls as Armand, the smithy below, wants to fight you, so you might want to check the Mina The Hollower Secret Bosses guide to find out what you need to do to beat him.

Other Mina The Hollower weapon upgrade locations
Aside from what the Blacksmith sells, there are a handful of red chests in the game that contain upgrades to each weapon. Since you’re probably going to want to grab these anyway, we’ll just give you their locations for now, but note that each upgrade significantly bolsters that weapon’s usability. For example, the whip gains boosted damage if you hit enemies at the tip for its first stage upgrade, while the second grants it a flailing ability similar to Simon Belmont’s whip from Super Castlevania 4. Here are the eight Mina The Hollower weapon upgrade locations:
- Queensbury Crypt: Old Graveyard – enter the manor from the front door and go up the stairs to the left. Leap over the gap and destroy the urn. Face left and attack the wall to reveal a secret exit leading to the weapon location.
- Nox’s Bayou: Swamp Shack – inside the Swamp Shack to the northeast corner of the swamp with the lily pads and the Nox Beast trying to eat you when it’s full. This house is where the Kindly Hag sells the Pit Preserver. Go to the top left and unlock with a Kear to access the red and gold chest and claim your weapon.
- Bone Beach: Worm’s Back – from the mirror point, head out and leap from the top right onto the bouncy things over the skull pile to the red chest.
- Coltrane Peak: Rail Yard – Dig through the bottom right corner underneath the rails to reach the burrow there. Go through this area to the top and back around to reach the chest, being careful of the Knight and the floating spikes. (You can also buy this at Panino in Ossex: Station Underpass for 5,000 Bones)
- Septemburg – Crow Town – in the southwest of the village, there’s a house on fire with a woman on the balcony. Approach from the western side and walk to the front door. As you walk away, a crow will jump through to attack. Defeat it and head inside. Make your way up the stairs and open the chest for the upgrade.
- Astral Orrery: Stellarium – after completing either the red or blue gates, use the Kear in the lock to the right side of the chamber and open up the chest.
- Loner’s Landing: Belowdecks – before you try getting the other two starter weapons, you need to have two Kears spare. Start at Pinky Gorilla’s shop in Backwater and steal the ladder. Make your way southeast, crossing the swamp, and go past the Swamp Station. You’ll eventually find yourself at Loner’s Landing. Set up the ladder next to the rope in the next screen down and then climb up. You’ll need to hop across the barrels and burrow under the ship to access below deck. To get at the weapons, hit the vines above them, then race to the southern end and pick one up.
- Radiant Manor: Courtyard – you will need at least five Vials to collect this weapon upgrade. Go to the Station Underside in Ossex and use a Drill Driver to leap across the gap to the rope on the other side. Climb the rope and deposit four Vials to unlock the path onward. Use the shortcut rope below and replenish your Vials at the Underlab. Burrow under the gap to the northeast and dig all the way to the Radiant Manor: Courtyard. You can break open the shortcut above you, but to your left is a chest guarded by a Lion Knight. Defeat him and open the vines to pave the way to the five Vial barrier. Deposit five Vials to reach the final chest.