
Many of my favorite home security kits are systems you can set up yourself, without professional visits or installation fees. Even traditionally professional-focused companies like ADT offer these DIY kits. But if it’s your first home security system, you need to know how to get started and where to put all those sensors in your home.
I’ve spent years testing out home security systems from every major brand, including every type of sensor you can find throughout my own home. Along the way, I learned the best practices and pitfalls you should know before you start to install your security kit. Here’s where to begin.
Important note: Before you buy, check out my list of the worst security system add-ons, and why you don’t need them when you’re picking out your products.
Gather your tools (you won’t need many)
Security kits don’t need many tools, but if you’re drilling a lot of holes, a studfinder can be helpful.
Modern DIY kits are designed for easy installation, so you won’t need much equipment. If you’re focusing on adhesive stickers, typically the 3M brand, your setup will be even faster.
I suggest preparing with a ladder, a drill and a screwdriver set when you’re ready. You shouldn’t need more than that, although if you plan on screwing several sensors into your wall, I also suggest using a studfinder to check for existing wiring and studs.
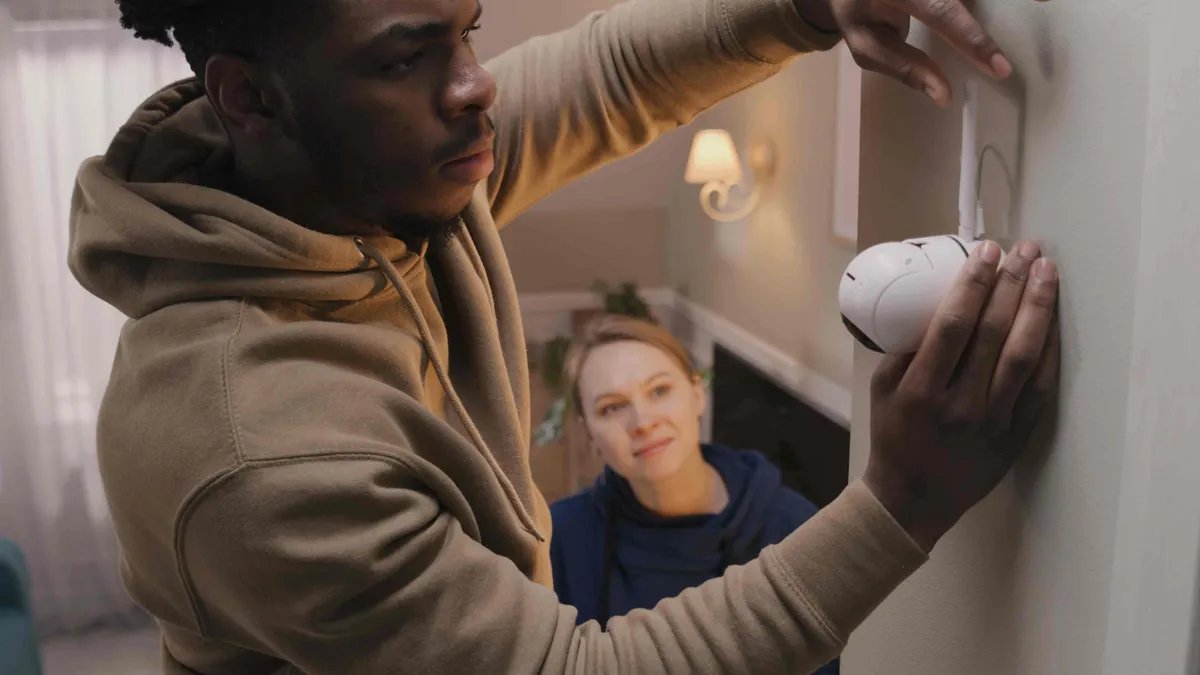
Start with the hub and expand outward
A security hub is the starting place for any installation.
The core of a DIY security system is the hub, which communicates with all the sensors and often includes the central keypad for tapping in your code. Some security kits can use existing devices — like an Apple HomePod — as a hub, but most will have their own standalone hubs. Unpack the hub, plug it in and download the security app to begin.
When making your account, create a robust password with symbols and numbers and enable any available encryption options. You may need or want to sign up for a security subscription at this point, so have financial information ready to pay for it.
Most apps will walk you through hub and setup and each sensor as you add it, with complete instructions for installation, including how to use batteries, ideas on where to put sensors and more. I prefer to use a tablet like an iPad during setup for better visibility and positioning as I move around the home.
If using adhesive strips, prep your surfaces carefully
Adhesive sensors can work in many places, but the right prep can help.
Your sensors should be light enough to install using adhesive strips, which many brands include in their DIY security kits. It’s the easiest option, but choose your spots carefully. This double-sided tape works best on smooth surfaces like windows, plastic trim, metal or coated wood. It may struggle more to hold devices on rough wood or drywall.
When prepping, press the tape firmly onto the device, then press the device in place on a clean surface and apply pressure for a minute or so to help it stick. On the right surfaces, this adhesive can be powerful, so position it carefully before pressing down.
Align access sensors at key vulnerable spots
Access sensors need careful alignment.
Access sensors use two parts: When they’re close together and properly aligned, the sensors read as closed, but when separated the sensors read as opened and can trigger alarms. They’re suitable for doors, windows and some drawers.
You don’t need many of these sensors to add powerful security. Burglars tend to check the front door, easily accessed first-floor windows, and the back or side door. Two or three access sensors in these spots should be all you need for protection.
I’d suggest experimenting with these sensors before attaching them so you can see where they should go without getting in the way of trim or your door/window opening and closing. The sensors should come with grooves so you can see how the two pieces need to line up. Only attach them when you’re sure of placement.
The exception to this rule is Aqara’s new P100 sensor ($30), which can accurately detect when doors and windows open or close using a single sensor, no alignment or tricky placement needed. Perhaps that’s going to be the future of access sensors, but it’s a rare technology for now.
Position motion sensors at neutral points
Motion sensors need the right spots to avoid accidental triggers.
Motion sensors can be helpful in entryways and rooms that are off-limits. But placement is very important. By neutral, I mean choosing a spot that’s around 6 to 7 feet above the floor — too high and the sensors can miss things, but too low and they may detect small pets too readily.
The general rule here is to aim motion sensors away from windows, TVs and mirrors to help them from accidentally triggering. They often work best on wall corners facing toward the center of a room.
Add glass break and vibration sensors sparingly
Aqara’s little vibration sensor can detect glass breaking, tampering, unexpected movement of objects and more.
These sensors detect if someone is trying to smash or force open an access point such as a window. If you already have access sensors, you probably don’t need many of these. Consider putting one or two on large, first-floor windows beside doors or in other easily accessed points.
However, keep in mind vibration sensors can detect other types of activity, too. With the right placement, one notify alert you if someone tries opening a locked drawer or safe, like a tamper alert.
Give each device a detailed name
Name devices clearly so there’s no confusion when you get an alert.
When you’re setting up sensors, most security apps will ask you to select a room and name for the sensor. Be as detailed as you can. Name the device clearly and accurately based on what it is and what it does. Differentiate between separate doors, multiple windows and so on. That makes it much easier when you’re changing batteries, moving sensors around or finding out what was triggered.
Run through sensitivity and arming settings when you’re done
Many apps have options to adjust motion detection sensitivity.
Once all your sensors are connected and active, take a little time to test them out and look at their settings to find sensitivity controls and other important capabilities. Run a few tests of your own, make sure that motion and vibration sensors don’t trigger too easily.
When you’re ready, schedule arm/disarm times and check that they’re working as intended. I’d suggest setting a healthy grace period for arming the system — 30 to 60 seconds or so — especially when getting started. Oh, and if you have any pets or kids around that don’t like loud sirens, maybe arrange a playdate while you’re testing out the triggers.
What if you’re using wired devices?
Wired sensors (outside of wired security cameras) are very rare in today’s DIY security kits. Almost all sensors are made to work via batteries, whether they’re AAA or rechargeable. If you are considering a system that uses wired-in components, you must make sure there is available wiring.
Typically, a house has to be built or remodeled with a fully wired security system in mind, like a large fleet of security cameras, otherwise it won’t be possible without a lengthy visit from an electrician. If you only want to add a single compatible cam, a nearby outlet or an available junction box is typically enough and takes much less work.
If you have security cameras as part of your kit, make sure you check out my list of the worst possible places for home security cams, and the best place to put cameras when installing. Cameras are slightly more complicated to install, but these guides are an ideal place to start.